
 Latest images
Potter!MK3 Golf(Engine build time!!)Bought another mk3 too :P
Page 6 of 6 • ![]() 1, 2, 3, 4, 5, 6
1, 2, 3, 4, 5, 6
![]()
 Re: Potter!MK3 Golf(Engine build time!!)Bought another mk3 too :P
![]() Lowlifedubber Tue Jul 31, 2012 5:32 pm
Lowlifedubber Tue Jul 31, 2012 5:32 pm
Tracking wise im taking it to the same place Jonny W took his mk5 i think

Lowlifedubber- Can't Shut Me Up

- Posts : 548
Join date : 2011-01-17
Age : 42
Location : Lincoln baby! -

![]()
![]()
Re: Potter!MK3 Golf(Engine build time!!)Bought another mk3 too :P
![]() Lowlifedubber Tue Jul 31, 2012 5:32 pm
Lowlifedubber Tue Jul 31, 2012 5:32 pm
A new Exide battery and a fan switch later and were all happy.
Today i had a bit of time to myself for a change so set about fitting the Flyeyes id bought for my headlights.....to my rear lights!
Thing is i really like the rear lights but ive always wished they were a tiny bit darker but i dont like tint spray.
Thought i would give it a whirl and it came out ok for me(dont do stickers or fabric)
I like the fact it is darker,im going to run it for a bit and if i decide to keep it im going to nip down to a window tint company and get them to fit some new to them perfectly.
Some phone pics(my car is minging sorry)


I also did my interior light.


While i was in there i fitted my genuine(but alas it was beige so i had to paint it) drivers side sunglasses holder that goes in place of the grab handle.


I also stripped both my front window switches and swapped out the green leds for red ones as i didnt have electric windows when i did the other stuff and had forgot about these.

Thats about it for now but i have a week to myself next week so there is more in the pipeline
Lowlifedubber- Can't Shut Me Up
- Posts : 548
Join date : 2011-01-17
Age : 42
Location : Lincoln baby! -
![]()
![]()
Re: Potter!MK3 Golf(Engine build time!!)Bought another mk3 too :P
![]() adi Tue Jul 31, 2012 7:17 pm
adi Tue Jul 31, 2012 7:17 pm

adi- WingMan

- Posts : 819
Join date : 2011-01-18
Age : 27
Location : Lincoln
![]()
![]()
Re: Potter!MK3 Golf(Engine build time!!)Bought another mk3 too :P
![]() Lowlifedubber Tue Jul 31, 2012 7:25 pm
Lowlifedubber Tue Jul 31, 2012 7:25 pm
Lowlifedubber- Can't Shut Me Up
- Posts : 548
Join date : 2011-01-17
Age : 42
Location : Lincoln baby! -
![]()
![]()
Re: Potter!MK3 Golf(Engine build time!!)Bought another mk3 too :P
![]() adi Wed Aug 01, 2012 8:44 am
adi Wed Aug 01, 2012 8:44 am
adi- WingMan
- Posts : 819
Join date : 2011-01-18
Age : 27
Location : Lincoln
![]()
![]()
Re: Potter!MK3 Golf(Engine build time!!)Bought another mk3 too :P
![]() Lowlifedubber Mon Aug 06, 2012 5:51 pm
Lowlifedubber Mon Aug 06, 2012 5:51 pm


So i set about fitting them.Heres how the old ones looked


Heres the chromed ones fitted.(notice how i didnt get my little gay engine in shot)


I also did a few other niggly jobs but nothing exciting.I just wanted to get loose ends tied up so i can crack on with the engine this week without worrying i should be doing something else on the car itself.
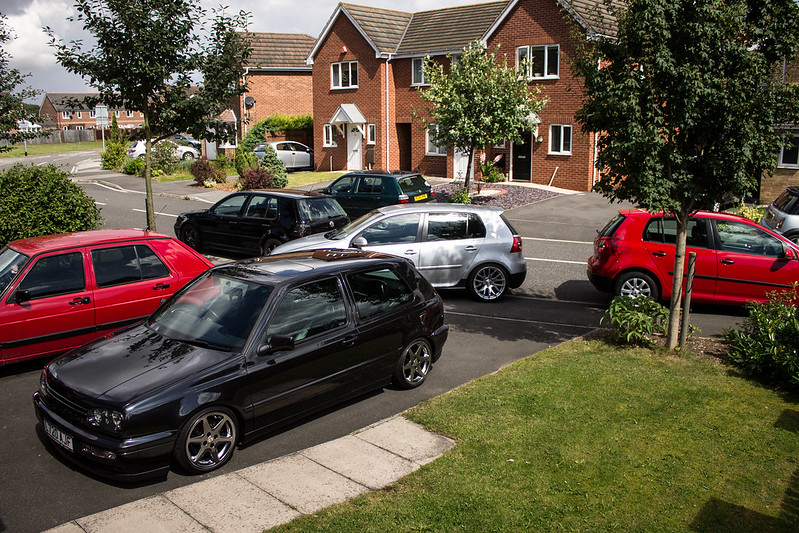
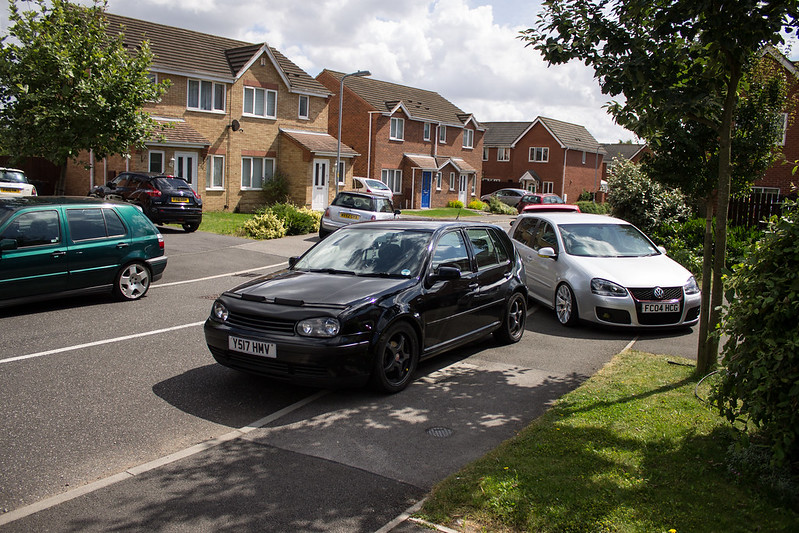
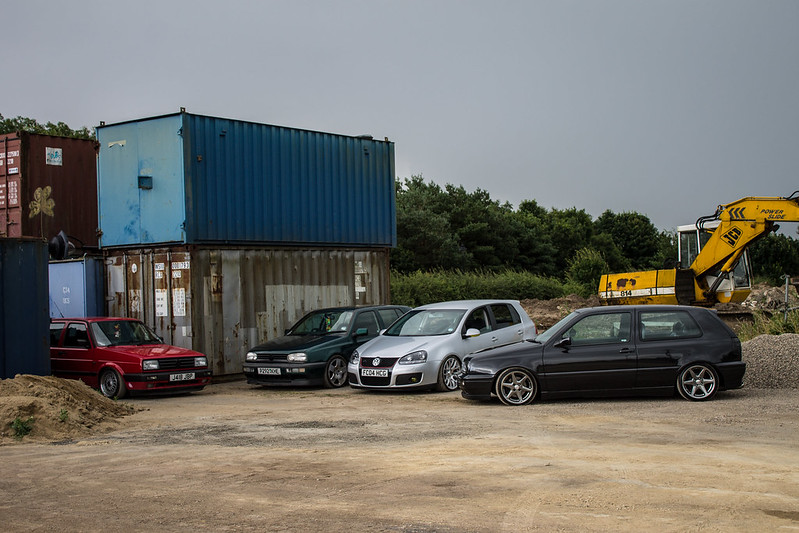
Also had a bit of a Golf Love day on my drive on saturday where i sorted a few peoples cars out and then we all went for a bit of a drive and took a few pics


By the end of the week there will be updates of the engine variety
Lowlifedubber- Can't Shut Me Up
- Posts : 548
Join date : 2011-01-17
Age : 42
Location : Lincoln baby! -
![]()
![]()
Re: Potter!MK3 Golf(Engine build time!!)Bought another mk3 too :P
![]() Lowlifedubber Wed Aug 08, 2012 6:34 am
Lowlifedubber Wed Aug 08, 2012 6:34 am
I never really knew what this engine was like but after a strip down i could see the chain guides had gone.
Anyway picture time.


Then it came to removing the head and 2 of the bolts had been rounded of by the previous owner.Tried everything but in the end i had to drill the fecking things out!
Only 2 of them though.


This is what it ended up like.


Sooo then i decided to do a bit of shopping for daft things like shells arp bolts etc and realised i still need all the ancillaries and subframe,loom etc.
Started ebaying and realised screw it it will be much cheaper to buy a full car with a blown engine.......
So im picking this up tonight.


Although its a bit of a pain towing it from Spalding to Lincoln(with another mk3 naturally) i may even be seeing Bucksfizzturbo on my way back as he is picking up something close to where im gunna be
To keep the woman happy as she doesnt really know yet,ive ordered a crap load of stuff for the garden so she cant moan.
Lowlifedubber- Can't Shut Me Up
- Posts : 548
Join date : 2011-01-17
Age : 42
Location : Lincoln baby! -
![]()
![]()
Re: Potter!MK3 Golf(Engine build time!!)Bought another mk3 too :P
![]() Lowlifedubber Wed Aug 15, 2012 7:57 am
Lowlifedubber Wed Aug 15, 2012 7:57 am
Also ended up wrapping a load of stuff and sending it as far as Ireland,Scotland and Cornwall.
Pics.
Engine ready for removal.

Quick pitstop for a man lunch.

and shes out.


In other news i took a load of engine parts to work at the weekend and gave them a clean up to save getting my parts bath dirty
I will grab some pics tonight.
Also been shopping and have some ARP rod bolts on the way and im currently in talks about some 9:1 pistons as id rather not use a head spacer.
Bought some silver and some black engine enamel too.
Thats it for now.
Oh no it isnt.

I have one of these badboys coming from the USA via a guy coming to Edition show.I can confirm i wont be the only one on this site with one as it seems somebody liked my idea that much he ordered one himself(Not naming any names though eh FuxBizzTurbo.
Lowlifedubber- Can't Shut Me Up
- Posts : 548
Join date : 2011-01-17
Age : 42
Location : Lincoln baby! -
![]()
![]()
Re: Potter!MK3 Golf(Engine build time!!)Bought another mk3 too :P
![]() adi Wed Aug 15, 2012 4:35 pm
adi Wed Aug 15, 2012 4:35 pm
adi- WingMan
- Posts : 819
Join date : 2011-01-18
Age : 27
Location : Lincoln
![]()
![]()
Re: Potter!MK3 Golf(Engine build time!!)Bought another mk3 too :P
![]() Lowlifedubber Fri Aug 17, 2012 2:58 pm
Lowlifedubber Fri Aug 17, 2012 2:58 pm
Right well the shell is ready for going on the blue thing ive sold just about EVERYTHING off it too.Made about £500 so its made me £200 plus all the money ive saved with now having a loom,box and ancillaries etc.
The loom is out and labelled and ive been stripping engines left right and centre as well as doing some shopping lists for engine parts etc.
Ive been stripping engine casings etc off and sticking them in the parts bath for a couple of days and then cleaning them up but i havnt taken pics yet.Although my engine paint has arrived now.
Mmmmm wiring.

Oh and these badboys came today.

Also in talks with Highflowheads about knife edging the crank and fitting me some new valve guides in one of the 3 heads i have got.
I will also be gasket matching them myself and then polishing my piston crowns after the weekend shift(or during lol).
Ive been onto most piston suppliers i can find in the uk to find some rings for these 82.5 pistons.Not really very happy about re using them and im having NO luck sourcing them
The search continues though eh.
Lowlifedubber- Can't Shut Me Up
- Posts : 548
Join date : 2011-01-17
Age : 42
Location : Lincoln baby! -
![]()
![]()
Re: Potter!MK3 Golf(Engine build time!!)Bought another mk3 too :P
![]() Lowlifedubber Mon Aug 20, 2012 11:03 am
Lowlifedubber Mon Aug 20, 2012 11:03 am
The blue thing has left the driveway now(thanks god) so i now have a few parts left but most of the good stuff has sold)
I was hoping to win some 9:1 Low comp pistons sunday night but ended up on a breakdown 5 mins before the end and got outbid by £4 :angry: :embarrassed:
So i spat my dummy out and decided i would make a start on my mock up short runner intake as i had a couple of hours of my 17 hour shift spare.
Bare in mind this is just off the cuff temp stuff so i can get measurements for the real deal.I will be using 6mm ally for the main plenum and then 10mm for the mani flange and the tb flange.


Thats all i managed to get done as one of the dickhead operators set some machinery on fire so i had to go put that out and then fix stuff.But i will crack on with it at home in the week.
Also took a couple of parts to clean up.
Heres the rear engine mount and the tensioner after a quick spruce up.Im thinking i may polish the rear mount.The tensioner needs a fair bit more work.


Thats it for now.The piston ring search continues though.....
Lowlifedubber- Can't Shut Me Up
- Posts : 548
Join date : 2011-01-17
Age : 42
Location : Lincoln baby! -
![]()
![]()
Re: Potter!MK3 Golf(Engine build time!!)Bought another mk3 too :P
![]() Lowlifedubber Wed Aug 29, 2012 5:57 pm
Lowlifedubber Wed Aug 29, 2012 5:57 pm
1st off my new shells for the bottom end have arrived!OE spec for good measure too!

Also on the way are the conrod shells(small end bearing) and also the crank thrust washers.Ive had a silly amount of trouble sourcing some 82.5mm oversize piston rings!Even spoke to MAHLE in sausage land but no joy.In the end i made a phone call to Vince @ http://www.stealthracing.co.uk/ and within 5 minutes they were ordered and will be here in a day or so!Cracking service!
I started painting the various engine casings with some silver engine enamel,gave them 3 coats but just wasnt happy so ive ended up ordereing some POR15 engine enamel paint(black and silver) now this stuff is meant to be the best in the world.It bloody better be seeing as for 2 small pots it was over £60! :sick:
But at least it will do the job.
Anyway,i was in 2 minds whether to send the block off to be checked out(bores,deck etc) but thought fluck it im an engineer i will check it out myself.If it needs work i will send it off.
1st off the bores.
The idea is to get 3 measurements of the bores just below the ring land,in the middle of the bore,then just above the piston skirt.
You need to do this across 2 axis.So out came the telescopic bore gauge and away i went.
Pics


The results

As you can see there is minimal egg shaping and no taper of the bores.Well withing manufacturer spec so all im going to do is give them a light hone and the jobs a bloody gudn!
Next up was checking the deck for straightness.I got a perfect straight edge and set about with a feeler gauge to check for clearance underneath the straight edge at various intervals.
Turned out the feeler guage wouldnt even go underneath and no daylight was visible at any point!Result!


Quite pleased withmyself that i hadnt just spunked £200 getting it checked out i started with the clean up.
1st off the sump.
Before

Then i cleaned up the faces and tapped the holes out to remove any crap

Then i taped the badboy up to protect it a bit while the other work goes on.
Thats it for now.If the woman doesnt make me taker her Skegvegas tomorrow i will start ccleaning the block up ready for paint!
Lowlifedubber- Can't Shut Me Up
- Posts : 548
Join date : 2011-01-17
Age : 42
Location : Lincoln baby! -
![]()
![]()
Re: Potter!MK3 Golf(Engine build time!!)Bought another mk3 too :P
![]() adi Wed Aug 29, 2012 11:02 pm
adi Wed Aug 29, 2012 11:02 pm
adi- WingMan
- Posts : 819
Join date : 2011-01-18
Age : 27
Location : Lincoln
![]()
![]()
Re: Potter!MK3 Golf(Engine build time!!)Bought another mk3 too :P
![]() Lowlifedubber Thu Aug 30, 2012 6:55 am
Lowlifedubber Thu Aug 30, 2012 6:55 am
Lowlifedubber- Can't Shut Me Up
- Posts : 548
Join date : 2011-01-17
Age : 42
Location : Lincoln baby! -
![]()
![]()
Re: Potter!MK3 Golf(Engine build time!!)Bought another mk3 too :P
![]() Lowlifedubber Fri Aug 31, 2012 6:06 am
Lowlifedubber Fri Aug 31, 2012 6:06 am
However i got the bores all honed out and 1.5 sides of the engine cleaned up.What a long laborious job!
Anyway a few pics.
Ring have come!

The trusty hone came out.

Crap loads of oil everywhere and were away.Got a nice 30-45 deg cross hatch.


Then 5 hours passed while i sat and took off all the blue paint that Grant Motorsport had put on my engine block many moons ago.(Thanks for that!)

After


Ive just got the dipstick guide to do now but that will have to be after the weekend as i have a couple of services to do and then the 36 hours at work this weekend.
More next week
Lowlifedubber- Can't Shut Me Up
- Posts : 548
Join date : 2011-01-17
Age : 42
Location : Lincoln baby! -
![]()
![]()
Re: Potter!MK3 Golf(Engine build time!!)Bought another mk3 too :P
![]() Lowlifedubber Tue Sep 11, 2012 4:24 pm
Lowlifedubber Tue Sep 11, 2012 4:24 pm
Engine wise.The block is completely stripped and ready for rebuild and then paint.I have everything for the bottom end bar the conrod bushes and crank thrust washers.GSF should have had these in for me last tuesday however a phonecall today revealed they are still in Belgium but will be here friday. :rolleyes:
Anyway rather than fit the R32 alloy sump and shorter oil pump i decided to plate the standard VR6 pressed metal affair.
I basically made a cardboard template then copied this over onto a 3mm MANGANESE plate bashed it about aand formed it round the sump and then welded it up.To protect the sump plug which is the lowest area I cut a 1/2bsp shed 10 pipe down the centre and welded this to the plate.
Should do the job.


Just got to fettle it up and then black enamel the bad boy and its ready to go on.
I also got this from Matt in the states who came over to Edition38 show with a few parts and Bucksfizzturbo was kind enough to pick it up from the show and post it over to me when he got home.(Thanks again Nath)

As it happens it was just the glass and no back plate so i had to remove the origina backing plate off a spare i had and then use some pink grip to restick it to the back.
Heres how it looks and im well chuffed.

Also got my front crossmember ground down and fettled ready for paint.Also whipped the cv joints off the driveshafts and cleaned this down.Made a start on the gearbox too but no pics of that as it isnt finished.


They are all in the garage with the 1st coat of paint on them.
Today ive spent a good few hours stripping the rings off the forged pistons and set about polishing the crowns for reduced carbon build up and just plain prettyness.


Oh i stripped all the valves out of the cylinder head im using the other day and sent it to be skimmed.They have taken 0.20 thou off it.

Then instead of taking it somewhere to get a mediocre port and polish i decided to do it myself.
So i have bought this.

Should do the job nicely
Ive also received the rest of the bottom end gasket kit and all the coreplugs so its just a case of waiting for the bits from GSF and i can build the bottom end up and paint it
Im also waiting for a NewSouth performance inlet manifold gasket.Should help to keep inlet temps down.Bloody expensive though!

http://www.newsouthperformance.com/gasket.htm
Oh and i had my 13 Row Mocal oil cooler arrive last week too!

In other news i took Potter on it's 1st longish trip(100mile) to a car meet in Hull for shits and giggles.
Crappy pic off my phone but you get the idea.

Thats it for now
Lowlifedubber- Can't Shut Me Up
- Posts : 548
Join date : 2011-01-17
Age : 42
Location : Lincoln baby! -
![]()
![]()
Re: Potter!MK3 Golf(Engine build time!!)Bought another mk3 too :P
![]() Lowlifedubber Tue Sep 18, 2012 5:03 pm
Lowlifedubber Tue Sep 18, 2012 5:03 pm
I found an Aqueous heated parts washer at work so raped that and cleaned a lot of my engine parts in it.Including a spare cylinder head i had.I stripped the valves out and decided it was in better looking condition than the one ive just had skimmed so im going with this one now.
1st off ive had my engine block on the bench and set about the fantastic task of gapping piston rings.
This entailed fitting the piston ring in the bore to 15mm from the bottom and measuring the gap with a feeler gauge.0.25-0.45 is what were aiming for so i got them all to about 0.35.
Fecking tedious job!


Then i pressed all the small end conrod bushes out and checked the thing was in tolerance which it was.I also got the mrs digital scales out and started balancing the rods.I managed to get them withing 0.5grams of one another so that will do me.


I dont have a pic of this but i then polished the rods and then pressed the new bushes in.The problem with the new bushes is they dont come with an oil hole,you have to drill it and ream it yourself.
I can go and buy a 20mm hand reamer and drill the oil hole myself and then clean the burrs out with guitar wire but i think i would like to get a machine shop to do it for piece of mind so i will get them dropped off this week sometime.
Once i had stripped the valves out of my new head and hot tanked it again i decided to give it all a good clean up in the ports and set about porting and polishing it.


Now i know this is going to take hours and hours and hours and ive got to be careful not to screw the valve seats(guides dont matter) so i had a few hours de carbonizing the valve bowls and the inlet tracts,smoothing out any steps and casting marks etc.
I then hit it with the catridge rolls to see how it looked and it is coming on well.However it is FAR from done.

Oh i got my front cross member enamelled as well as my drive shafts.


This also came in the post today so i can set about checking my oil clearances on all bearings now

Tomorrow im helping a guy off vr6oc swap an engine so i wont get back on this while thursday but im hoping to get some more done then
In other news a very good detailer in my area http://www.deep-shine.co.uk/ is sponsering Hulloween Cruise https://www.facebook.com/events/413393745380201/ and has a stand there for 2 cars and has asked Potter to take one of them.So im going to book a rare saturday off work and go through for that.
Im also debating what valve springs and valves to go for.Im considering going with Shrick valves,keepers,shims and followers and using Ferrea sodium filled valves but im still researching atm so that might not be for the next month or so.
Thats it for now
Lowlifedubber- Can't Shut Me Up
- Posts : 548
Join date : 2011-01-17
Age : 42
Location : Lincoln baby! -
![]()
![]()
Re: Potter!MK3 Golf(Engine build time!!)Bought another mk3 too :P
![]() adi Wed Sep 19, 2012 6:59 am
adi Wed Sep 19, 2012 6:59 am
adi- WingMan
- Posts : 819
Join date : 2011-01-18
Age : 27
Location : Lincoln
![]()
![]()
Re: Potter!MK3 Golf(Engine build time!!)Bought another mk3 too :P
![]() Lowlifedubber Thu Nov 01, 2012 12:29 pm
Lowlifedubber Thu Nov 01, 2012 12:29 pm
So ive started to build the bottom end up and as usually happens i ran into some problems.
I bought some new conrod bushes(little end bearings) and rather than me reaming them out with a hand reamer i took them to a machine shop and got them to do it so they were bang on.
I pressed the bushes out and pressed the new ones in myself mind.
Anyway as i went to build the pistons up with new rings and connect the rods i noticed i had 0.25mm of play with just one but the others were perfect.Soooo i spat my dummy out pressed the new bush out and went to get some more.
None in the country ANYWHERE :angry: so i got some sent from vw Germany and pressed it in and took it back to the machine shop and i will be picking that up tomorrow.
I also found upon rebuilding that i had 3 oil squirter jets missing.Agin,none in the country so i ordered some and they came from vw Germany a few days later.
I then decided to purchase some ARP headstuds and nuts.Oh and i ditched the 13 row oil cooler in favour of a 19 row Mocal oil cooler braided pipes and a thermostatically controlled sandwich plate.
So i set about building the bottom end up including VERY carefully putting the new rings on the pistons and connecting the con rods etc.
On the crank end of things i used plastiguage to make sure my oil clearance around the crank journals were perfect.I also measured them with a dial bore guage and vernier just because i prefer to double check shizzle.
new OE shells and stuff including thrust washers were used and once built up a checked the crank end float with a dti gauge.
Few pics


I think there roughly in order lol.
Also im about 20 hours into my cylinder head port and polish.This included pressing the valve guides out,grinding,grinding,grinding then a lot of hours polishing the inlet,exhaust ports and the valve bows while being very careful not to screw the valve seats!.Ive also gasket matched the inlet side to the Newsouth performance inlet mani gasket.They now have a nice flute and ive got another 5 hours on the head before its mirror polished and ready for new guides a skim and a 3 angle valve job on the seats.


How its looking now.


I finally decided on a weight i want my flywheel and rather than send it to Hot Golf i really wanted to have a go myself.
So we have a machine at work thats roughly £1million pounds worth so i decided to use this.It was simply a case of measuring the flywheel diameter finding the centre using a probe and then writing a program across the zxy axis' to follow the outside of the flywheel going down in 0.5mm increments until the desired weight was acheive.Which in this case is 5.5kg.


Couple of vids here if you have facefluff.
https://www.facebook.com/photo.php?v=10152216998970389
https://www.facebook.com/photo.php?v=10152217037695389
Oh ive also knocked up a cam timing tool out of ally to save buying one.

Aaaaand ive stripped the spare subframe off the vr6,cleaned it up and painted it in black enamel,pulled the track rod arms out as i will be replacing with new and ive just ordered a powerflex steering rack polybush which will go nicely with the eibach front anti roll bar ive just bought.


So ive just got in from my next engine dilemma.
The oil pump drive intermediate shaft has a shell type bearing that fits into the block.I noticed this was proper fubarred!Enough to screw the intermediate shaft which i do believe will be the reaason the engine was taken out of commission after Grant Motorsport had built it a few years ago.
So,no problem i will just get a new one....WRONG! Nobody in Europe (trust me i tried everywhere)can supply this part and VW have NEVER done a replacement part and it doesnt even come with a new intermediate shaft
So lots of swearing,kicking small puppies and shouting at the missus later i thought id have to either scrap the block or get the hole machined out machine a bush and get a bearing made!
Then a stroke of luck and i got in touch with Fourseasons tuning in America and low and behold they have a set on the shelf!!So ive ordered some and they should be here in 10 days along with some valve guided i bought as they are slightly shorter to allow for a mega lift set of cams
The offending item.


In other news i got a set of lights made up from a guy in Ireland as i fancied a change.The work he does in immense and while they dont suit the car the lights have had hours spent on them smoothing the dimples out,removing the writing and then painting in a Tamiya polycarbonate body red paint.
Just not feeling them but i think if i had a bootlid with a numberpalte recess they would look spot on


Thats it for now.Im waiting on parts to finish the bottom end off and then its time to concentrate on the cylinder head.
Potter will be coming off the road end of November and getting sorned and whacked on steelys,coilovers raised,engine out and time to start smoothing. :cool:
Lowlifedubber- Can't Shut Me Up
- Posts : 548
Join date : 2011-01-17
Age : 42
Location : Lincoln baby! -
![]()
![]()
Re: Potter!MK3 Golf(Engine build time!!)Bought another mk3 too :P
![]() Lowlifedubber Thu Nov 08, 2012 5:58 pm
Lowlifedubber Thu Nov 08, 2012 5:58 pm
So i gave the power steering rack a paint up and service.Checked all end float etc is fine and then built it up ontto the freshly painted subframe and while i was at it i fitted the new Eibach anti roll bar.Oh and then realised i didnt have a polybush for the rack so nipped out and got one.Now dont laugh but im going to be changing this now for the simple fact its purple and doesnt match the roll bar.


It now resides upstairs in one of the spare rooms.Arguments have ensued ever since with the good lady.She soon quietened down when i threatened to remove her walk in wardrobe and reclaim my man room back mind.

Then i went to work and finished off my flywheel lightening.I tried to get as close to 5.5kg as possible.

Also took my conrod and stuck it on the pillar drill to ream out my oil clearance hole the stupid machine shop forgot to do.I then set about the bush with some 2000grit paper so the gudgeon pin fitted perfectly.

Then cleaned up my OE cooler,power steering pump and oil filter housing,back to bare metal waiting for paint.


Then i realised i needed a United Motorsports billet alloy cap and extension tube to mate the oe cooler to the mocal cooler.


I finally got the last piston in and then pulled the block off the bench and after warming it up with a blow torch to get it nice and warm for paint i set about it with some POR-15 Black paint.Very expensive but meant to be the best.


Quite chuffed with that i cracked on with building up a few ancillaries!
OE Metal water pump

Core plugs in all round!

Oil coolers,oil filter housing and ARP head studs in.


Thats it for now.Still awaiting my parts for the intermediate shaft from america and also the valve guides for the head.
Starting to look like and engine now though which is giving me a bit of a chubby!
Lowlifedubber- Can't Shut Me Up
- Posts : 548
Join date : 2011-01-17
Age : 42
Location : Lincoln baby! -
![]()
![]()
Re: Potter!MK3 Golf(Engine build time!!)Bought another mk3 too :P
![]() Lowlifedubber Fri Nov 09, 2012 7:35 pm
Lowlifedubber Fri Nov 09, 2012 7:35 pm


I wanted it this high to make life easier getting a jack in and out and also because im off away next week and will be blocking the car in with another one so need to get the car up on the grass to the right and there is a big step.
However.My missus prized weeping willow tree had a good chance of blowing its evil branches onto the car.......so i chopped one side of it off. :whistle: :grin:

Needless to say wwere not talking too much atm. :grin:
Ah well.More in a week or so when i return from Belgium.Hopefully my parts from the states will be here so i can crack on!
Lowlifedubber- Can't Shut Me Up
- Posts : 548
Join date : 2011-01-17
Age : 42
Location : Lincoln baby! -
![]()
![]()
Re: Potter!MK3 Golf(Engine build time!!)Bought another mk3 too :P
![]() Lowlifedubber Thu Nov 22, 2012 6:09 pm
Lowlifedubber Thu Nov 22, 2012 6:09 pm
So we come home and a few more finished car parts make it into the house.Clean and painted and not dirty at all.She went a bit mental and said my wheels arnt allowed in the house.
I of course listened intently and chose to ignore her............


In other news my car now looks like a scrapper


:embarrassed:
But on the upside Potter came 1st in the forums calender competition which im absolutely AMAZED at!Well chuffed to make it into it a second year and with such a great result too.
Lowlifedubber- Can't Shut Me Up
- Posts : 548
Join date : 2011-01-17
Age : 42
Location : Lincoln baby! -
![]()
![]()
Re: Potter!MK3 Golf(Engine build time!!)Bought another mk3 too :P
![]() Lowlifedubber Sun Mar 17, 2013 10:41 am
Lowlifedubber Sun Mar 17, 2013 10:41 am
My main problem was waiting for parts.
My Ferrea Competition plus single groove valves came
I ordered some Schrick valve springs and shims just before xmas and it turned out some arse of a company had bought 5000 units of every part in the Schrick catalogue.So i had to wait nearly 3 fecking months for them!
I have received my head spacer to reduce the compression to 8.8:1 and my Gruvenparts crack pipe has arrived and thats fitted after a polishing.
So while i was waiting for various parts to materialize i decided that all the cam chain casings and stuff was going to get a polishing within an inch of its life.So bought a bench grinder and a load of mops and compounds and got to work.
Absolute fecking nightmare!Very time consuming but im getting there and in my efforts to do everything myself its turning out well.
In other news im slowly taking the car out of hibernation.Decided to strip the brakes and fit a rebuild kit with new pistons and seals etc they are back on but havnt taken pics of it all painted up yet as it always seems dark when im at home.I also stuck some uprated c.v joints on to test out before i put the engine in.
I also had a blemish on my tailgate where someone had hit the thing with a football so that got whipped off and is currently in paint at http://www.ultimate-carcare.co.uk/ i begrudge spending money on paint on the rear end tbh as im changing it up next year but i cant run it this season as it is as it will bug the crap out of me.
I also have started work polishing the rear tailgate lifters.One left to do.
Errrrrrm oh yeah i went to Ultimate Dubs to pick myself some new wheels up off a guy that was selling them on FB.Very pleased with my purchase.They are rare Autostrada Modena rims.
16" ET22 8J 2 piece on the rear and 7j 3 piece on the front.They came with no centre caps or nuts which means i got them for a good price.But me being me before i had even picked them up i had the billets of ally sorted and an agreement with a local machinist that he would make me some exact replicas!
I also want to go 7.5j on the front so i can get a slight tuck when i stick it on air so im looking for some 40 hole 1.5" lips,which are hard to find but i will do it.
My aim is to have them fully mirror polished
I also got a local artist bird to draw my car for me just for sh!ts and giggles.Well chuffed with how it turned out.
I finish my 2.5month every day at work stint on good friday and then the car is getting sorted for a week,full detail(weather permitting) old wheels back on along with the newly painted tailgate and the rear lights can go back in too.
I think thats it......Picture time.
[img width=736 height=552]https://fbcdn-sphotos-b-a.akamaihd.net/hphotos-ak-ash3/47660_10152375154945389_795643640_n.jpg[/img]
[img width=720 height=960]https://fbcdn-sphotos-g-a.akamaihd.net/hphotos-ak-ash3/524654_10152401073035389_648035713_n.jpg[/img]
[img width=720 height=960]https://fbcdn-sphotos-d-a.akamaihd.net/hphotos-ak-ash4/318027_10152401073280389_1293215900_n.jpg[/img]
[img width=736 height=552]https://fbcdn-sphotos-f-a.akamaihd.net/hphotos-ak-ash4/394923_10152466532495389_810207969_n.jpg[/img]
[img width=736 height=552]https://fbcdn-sphotos-e-a.akamaihd.net/hphotos-ak-prn1/72984_10152474937940389_1223401831_n.jpg[/img]
[img width=736 height=552]https://fbcdn-sphotos-d-a.akamaihd.net/hphotos-ak-ash3/67440_10152466856210389_2072722357_n.jpg[/img]
[img width=736 height=552]https://fbcdn-sphotos-e-a.akamaihd.net/hphotos-ak-prn1/72353_10152595159355389_1288347052_n.jpg[/img]
[img width=736 height=552]https://fbcdn-sphotos-b-a.akamaihd.net/hphotos-ak-prn1/734279_10152466855985389_1112960712_n.jpg[/img]
[img width=736 height=552]https://fbcdn-sphotos-h-a.akamaihd.net/hphotos-ak-ash3/556575_10152466855850389_2096256649_n.jpg[/img]
[img width=640 height=960]https://fbcdn-sphotos-c-a.akamaihd.net/hphotos-ak-ash3/61824_10152321971685389_811568430_n.jpg[/img]
[img width=736 height=489]https://fbcdn-sphotos-d-a.akamaihd.net/hphotos-ak-snc7/400021_10152370154710389_2036057115_n.jpg[/img]
[img width=736 height=489]https://fbcdn-sphotos-f-a.akamaihd.net/hphotos-ak-snc7/375357_10152370154805389_1790238572_n.jpg[/img]
[img width=736 height=552]https://fbcdn-sphotos-f-a.akamaihd.net/hphotos-ak-ash4/406255_10152591762420389_744059805_n.jpg[/img]
[img width=736 height=552]https://fbcdn-sphotos-d-a.akamaihd.net/hphotos-ak-ash3/529705_10152591762535389_599298177_n.jpg[/img]
[img width=736 height=552]https://fbcdn-sphotos-b-a.akamaihd.net/hphotos-ak-snc7/480133_10152591762645389_1622158061_n.jpg[/img]
[img width=720 height=960]https://fbcdn-sphotos-h-a.akamaihd.net/hphotos-ak-ash3/531149_10152591762715389_177450286_n.jpg[/img]
[img width=736 height=552]https://fbcdn-sphotos-a-a.akamaihd.net/hphotos-ak-ash4/482640_10152591762960389_52226150_n.jpg[/img]
[img width=736 height=552]https://fbcdn-sphotos-e-a.akamaihd.net/hphotos-ak-ash3/535425_10152592260110389_1941759599_n.jpg[/img]
[img width=736 height=552]https://fbcdn-sphotos-a-a.akamaihd.net/hphotos-ak-ash3/542746_10152592260300389_668487057_n.jpg[/img]
[img width=736 height=552]https://fbcdn-sphotos-a-a.akamaihd.net/hphotos-ak-prn1/67027_10152592260625389_1041540497_n.jpg[/img]
[img width=736 height=552]https://fbcdn-sphotos-g-a.akamaihd.net/hphotos-ak-prn1/529710_10152592260965389_1068314919_n.jpg[/img]
[img width=720 height=960]https://fbcdn-sphotos-e-a.akamaihd.net/hphotos-ak-prn1/625574_10152592261390389_810394404_n.jpg[/img]
[img width=720 height=960]https://fbcdn-sphotos-f-a.akamaihd.net/hphotos-ak-ash3/555202_10152592261605389_827215722_n.jpg[/img]
[img width=736 height=552]https://fbcdn-sphotos-f-a.akamaihd.net/hphotos-ak-ash4/374378_10152592262105389_339106718_n.jpg[/img]
[img width=720 height=960]https://fbcdn-sphotos-e-a.akamaihd.net/hphotos-ak-prn1/644459_10152617813245389_447466085_n.jpg[/img]
[img width=720 height=960]https://fbcdn-sphotos-h-a.akamaihd.net/hphotos-ak-ash3/486801_10152617814140389_575931454_n.jpg[/img]
[img width=736 height=552]https://fbcdn-sphotos-a-a.akamaihd.net/hphotos-ak-ash3/542772_10152617433480389_1083582201_n.jpg[/img]
Looks like a scrapper
[img width=736 height=548]https://fbcdn-sphotos-h-a.akamaihd.net/hphotos-ak-prn1/11257_367204933386831_1064854209_n.jpg[/img]
[img width=513 height=960]https://fbcdn-sphotos-e-a.akamaihd.net/hphotos-ak-prn1/421791_370192973088027_1111668723_n.jpg[/img]
[img width=640 height=960]https://fbcdn-sphotos-b-a.akamaihd.net/hphotos-ak-prn1/68626_10152375303060389_416936816_n.jpg[/img]
Lowlifedubber- Can't Shut Me Up
- Posts : 548
Join date : 2011-01-17
Age : 42
Location : Lincoln baby! -
![]()
![]()
Sponsored content
![]()
![]()
Page 6 of 6 • ![]() 1, 2, 3, 4, 5, 6
1, 2, 3, 4, 5, 6
![]()

 Similar topics
» wanted mk3 gti 8v engine
» who needs an engine conversion?
» engine stand
» Anyone want to help me do an engine rebuild?
|
|
|