
 Latest images
budget 20 valve turbo build from page 5
Page 3 of 3 • ![]() 1, 2, 3
1, 2, 3
![]()
 Re: budget 20 valve turbo build from page 5
![]() lemski Mon Feb 21, 2011 9:13 am
lemski Mon Feb 21, 2011 9:13 am

lemski- Top Of The World (Legend)
")
- Posts : 1462
Join date : 2011-01-17
Age : 33
Location : north cotes
![]()
![]()
Re: budget 20 valve turbo build from page 5
![]() adi Mon Feb 21, 2011 10:20 am
adi Mon Feb 21, 2011 10:20 am

adi- WingMan

- Posts : 819
Join date : 2011-01-18
Age : 27
Location : Lincoln
![]()
![]()

lewis1641- WingMan
- Posts : 1002
Join date : 2011-01-18
Age : 45
Location : brigg -

![]()
![]()
Re: budget 20 valve turbo build from page 5
![]() adi Mon Feb 21, 2011 11:35 am
adi Mon Feb 21, 2011 11:35 am
adi- WingMan
- Posts : 819
Join date : 2011-01-18
Age : 27
Location : Lincoln
![]()
![]()
Re: budget 20 valve turbo build from page 5
![]() Sakers Mon Feb 21, 2011 2:03 pm
Sakers Mon Feb 21, 2011 2:03 pm

Sakers- Starting To Speak

- Posts : 89
Join date : 2011-01-31
Age : 31
Location : Cleethorpes
![]()
![]()
Re: budget 20 valve turbo build from page 5
![]() roccy Tue Feb 22, 2011 11:21 pm
roccy Tue Feb 22, 2011 11:21 pm

roccy- Top Of The World (Legend)
- Posts : 1014
Join date : 2011-01-17
Age : 33
Location : grimsby
![]()
![]()
Re: budget 20 valve turbo build from page 5
![]() lewis1641 Fri May 27, 2011 10:59 am
lewis1641 Fri May 27, 2011 10:59 am
half way through replacing the rear brakes and bearings and just bought a set of RH AE wheels - think i am going to fit them for a while.
watch this space
lewis1641- WingMan
- Posts : 1002
Join date : 2011-01-18
Age : 45
Location : brigg -
![]()
![]()
Re: budget 20 valve turbo build from page 5
![]() lewis1641 Fri May 27, 2011 8:07 pm
lewis1641 Fri May 27, 2011 8:07 pm
pics of the rh wheels...

lewis1641- WingMan
- Posts : 1002
Join date : 2011-01-18
Age : 45
Location : brigg -
![]()
![]()
Re: budget 20 valve turbo build from page 5
![]() lemski Sun May 29, 2011 10:18 am
lemski Sun May 29, 2011 10:18 am
lemski- Top Of The World (Legend)
- Posts : 1462
Join date : 2011-01-17
Age : 33
Location : north cotes
![]()
![]()
Re: budget 20 valve turbo build from page 5
![]() lewis1641 Fri Sep 28, 2012 11:49 am
lewis1641 Fri Sep 28, 2012 11:49 am
lewis1641- WingMan
- Posts : 1002
Join date : 2011-01-18
Age : 45
Location : brigg -
![]()
![]()
Re: budget 20 valve turbo build from page 5
![]() adi Fri Sep 28, 2012 11:57 am
adi Fri Sep 28, 2012 11:57 am
adi- WingMan
- Posts : 819
Join date : 2011-01-18
Age : 27
Location : Lincoln
![]()
![]()
Re: budget 20 valve turbo build from page 5
![]() lewis1641 Fri Sep 28, 2012 12:17 pm
lewis1641 Fri Sep 28, 2012 12:17 pm
lewis1641- WingMan
- Posts : 1002
Join date : 2011-01-18
Age : 45
Location : brigg -
![]()
![]()
adi- WingMan
- Posts : 819
Join date : 2011-01-18
Age : 27
Location : Lincoln
![]()
![]()
Re: budget 20 valve turbo build from page 5
![]() lewis1641 Sat Sep 29, 2012 9:25 am
lewis1641 Sat Sep 29, 2012 9:25 am
right, lets bring this up to date.
Afew months ago the engine developed an oil leak (filter housing) then the gearbox went. We were weighing up options of just getting it running again or installing the lightened and balanced engine from my old track car.
Around the same time I was offered an AUQ engine from a Leon Cupra with, and i quote "everything needed for the full conversion"......
A deal was done, cash was borrowed, workshop space was booked and off we trotted.

IMAG1316 by lewis1641, on Flickr
Kai removed the old motor and that went to ben nash who i believe is rebuilding it.
With the engine out i took the opportunity to clean, derust and spray a few bits of the engine bay.
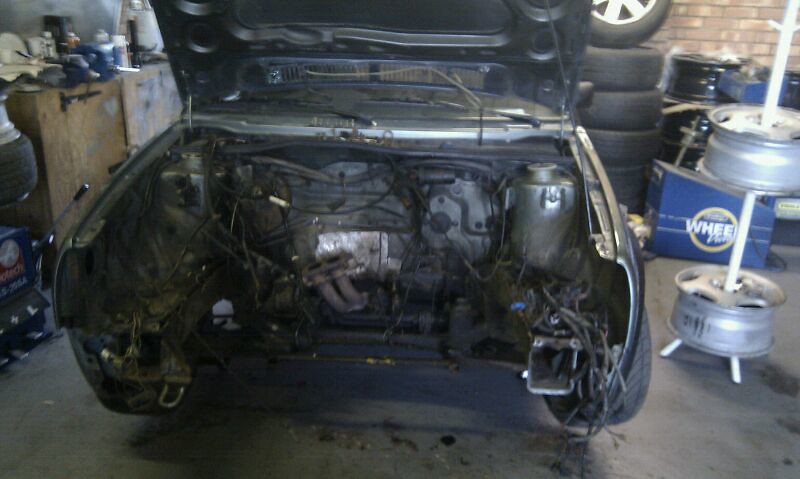
IMG-20120514-WA0005 by lewis1641, on Flickr
Clutch/Flywheel/Gearbox
The engine came with a G60 clutch and flywheel already installed. I am not too sure if this is done simply to get rid of the problematic dual mass fly wheel, or if it was necessary to enable the use of the o2a gearbox, this particular one being from a diesel. the 02a and 02j boxes are commonly used in these conversions as they are readily available and apparently, good and strong...
Using the o2a does present some issues though - the gear change is cable operated so you need to use a vr6 gear lever and cable set up. also the clutch on these is hydraulic which gives 2 obviuos solutions. You can swap the pedal box over from a corrado to give a hydraulic pedal, or alter the box. We opted for the latter using parts off a seat (i will add part numbers for reference). Info of what is needed online was a little vague so we got part numbers and bought them new. came to about £100.
02b141708a bracket £62.65 - this bolts to the box and includes the rod that operates the release bearing
02a141728 boot £6.65 not needed as the above part number comes with the biit fitted
357199356 support £38.35 Needed to give the clutch cable a cable stop so it can operate
sn10241605, sn10155207, no195324 nut bolt screw for mounting the suppurt.

IMAG1390.jpg by lewis1641, on Flickr
Engine Mounts.
To fit this into a mk2 you done need special mounts. Take the mounts off the old engine and fit them to the 20v. replace the rubber mounts (i was told to use g60 ones but not sure if they are any different to be honest)
The engine bolts straight it.

DSC_0093 by lewis1641, on Flickr
Last edited by lewis1641 on Sat Oct 20, 2012 9:16 am; edited 2 times in total
lewis1641- WingMan
- Posts : 1002
Join date : 2011-01-18
Age : 45
Location : brigg -
![]()
![]()
Re: budget 20 valve turbo build from page 5
![]() lewis1641 Sat Sep 29, 2012 9:30 am
lewis1641 Sat Sep 29, 2012 9:30 am
driveshafts.
the o2a has 100mm flanges so the standard shafts bolt straight up. This is ok if you are sticking with mk2 based hubs and brakes but we opted for mk3 bits, more of which later.
The shafts i am using are mk3 gti items. This gives a 100mm flange, thicker splines for the hub and the correct length for the widetrack conversion.
lewis1641- WingMan
- Posts : 1002
Join date : 2011-01-18
Age : 45
Location : brigg -
![]()
![]()
Re: budget 20 valve turbo build from page 5
![]() lewis1641 Sat Sep 29, 2012 9:40 am
lewis1641 Sat Sep 29, 2012 9:40 am
Initially i was going to run a 312mm set up (that was fitted to the wife's tdi estate), however this limits my wheel choice and having spoken to a few people on the subject, they would be far bigger than necessary.
With this in mind i have gone for a 288mm set up off a vr6 (thanks to gary forrest)
5 stud mk3's have a different ball joint set up to 4 stud cars (incl mk2) so you cant bolt the hubs onto the bottom arms. Thankfully the arms are interchangeable though.
The arms that came off the mk2 were polly bushed and we managed to press these out and into the mk3 arms. With the arms bolted in place the hub can be bolted to it. From here you have options. To keep it 4 stud the centre part of the hub can be pressed out, new bearings in then use the centre from your original hubs. you'll then need to source 4 stud 288mm discs though. I was happy to run 5 stud though so fitted up the hubs as per stock. Doing this also gives you 14mm wheel bolts.
Mk3 vr6 flexi hoses are then needed to plumb the calipers in.
The next issue is the steering arms. mk2 and 3 track rod ends are the same part number so are interchangeable but the rack ends are longer in the mk2 so these need swapping over too, otherwise the wheels will be pointing in opposite directions.
edit, mk 2 and 3 struts are interchangeable too so they bolt up to the hubs as normal.
further edit, rear brakes.
To match the front end it would be normal to install a mk3 rear axle, this will give a wider track and a 5 stud brake set up.
I have cheated and just fitted mk3 gti rear discs (wheel bearing part numbers are the same so they are a direct fit). The wheels i am using are 8.5" on the rear so i need all the room i can get, hence sticking with narrow track, for now at least.
lewis1641- WingMan
- Posts : 1002
Join date : 2011-01-18
Age : 45
Location : brigg -
![]()
![]()
Re: budget 20 valve turbo build from page 5
![]() lewis1641 Sat Sep 29, 2012 10:03 am
lewis1641 Sat Sep 29, 2012 10:03 am
I struck it lucky on ebay and found someone breaking a mk2 with an AUQ lump fitted. I secured the custom exhaust, intercooler and pipework for around £100
The exhaust is a bodge and will be replaced as soon as funds allow. It works and fits so is ok for now. The "custom" downpope is nothing more than the standard pipe hacked about, the system is 3" wuth a single silencer and a god awful back box. When i get my own way i want the back box to appear as stock as possible

IMAG1524 by lewis1641, on Flickr
Intercooler is off a mercedes sprinter and is pretty big. We chopped the slam panel about to enable it to fit. we have got justr enough room for the 4 light grill to fit. Just

IMAG1523 by lewis1641, on Flickr
The internet says you need a 1.3 rad for the conversion, otherwise you need to mess around with custom cooland hoses/search around scrap yards. I ordered a 1.3 rad. Turns out there are several of them! I now have the right one and i will add part numbers.
Last edited by lewis1641 on Sat Sep 29, 2012 11:19 am; edited 1 time in total
lewis1641- WingMan
- Posts : 1002
Join date : 2011-01-18
Age : 45
Location : brigg -
![]()
![]()
Re: budget 20 valve turbo build from page 5
![]() lewis1641 Sat Sep 29, 2012 10:23 am
lewis1641 Sat Sep 29, 2012 10:23 am
2 main options here, splice the looms and run the standard management or ditch the lot and run aftermarket.
If you go standard you either need the clocks, key and ignition barrel off the donor car or you need to remove the immobiliser off the ecu.
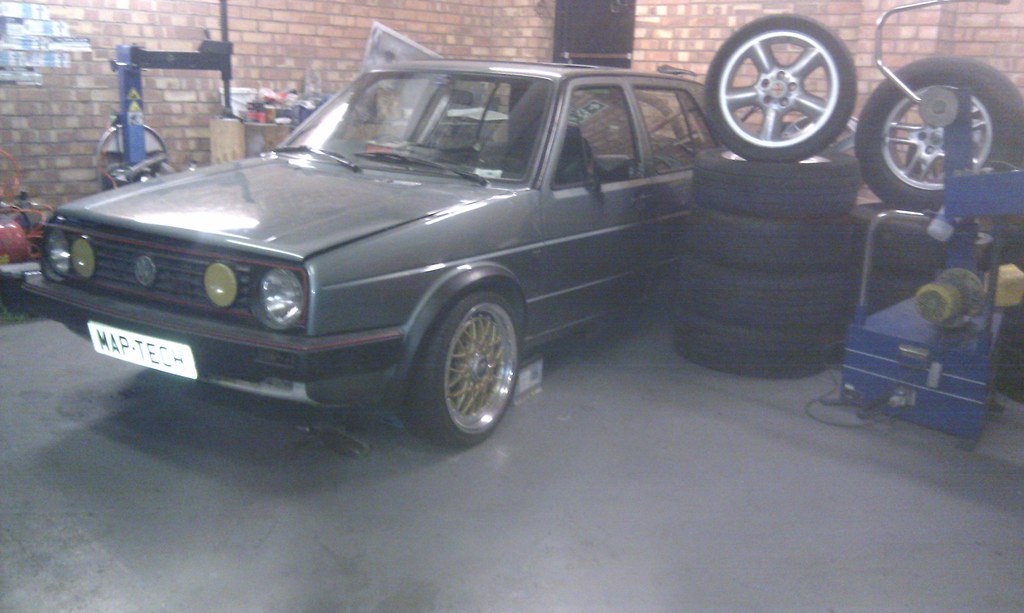
I decided to run the standard set up, mainly for cost reasons. www.map-tech.co.uk removed the immobiliser for me (would normally be a £60 job but they offer discounts if you have a remap at the same time).
We downloaded "rub jonny"s step by step guide for splicing the looms and we are currently 2/3rds of the way through this at the moment. Big thanks to Gareth at map-tech and Pete Chantry for the wiring
lewis1641- WingMan
- Posts : 1002
Join date : 2011-01-18
Age : 45
Location : brigg -
![]()
![]()
Re: budget 20 valve turbo build from page 5
![]() lewis1641 Sat Sep 29, 2012 11:14 am
lewis1641 Sat Sep 29, 2012 11:14 am

lewis1641- WingMan
- Posts : 1002
Join date : 2011-01-18
Age : 45
Location : brigg -
![]()
![]()
Re: budget 20 valve turbo build from page 5
![]() lewis1641 Mon Oct 29, 2012 10:12 am
lewis1641 Mon Oct 29, 2012 10:12 am
Also had an amusing issue with the brake lights, connected the battery and the brake lights are on continually. Lots of head scratching and panicking that we had spliced a wrong wire, turns out the switch in the pedal was faulty!
so to do,
1. replace ignition switch which will hopefully allow the engine to start
2. woop and high 5 everyone on the industrial estate
3. weld captive nut back on chassis leg
4. front brake flexis
5. radiator hoses
6. relocate battery or intercooler
7. GEAR BOX BOLTS
8. clutch cable (off a 1.3 mk2
9. wheels and tyres
10. check fluids and a full bolt check
11. mot
12. start the bodywork.....
lewis1641- WingMan
- Posts : 1002
Join date : 2011-01-18
Age : 45
Location : brigg -
![]()
![]()
Re: budget 20 valve turbo build from page 5
![]() lewis1641 Mon Oct 29, 2012 10:12 am
lewis1641 Mon Oct 29, 2012 10:12 am
gareth from map-tech.co.uk worked a little magic last night. we have an issue with the fuel pump wiring but we got the engine struck up
massive relief that it runs!
slight concern that there was rather a lot of oil coming out of the turbo-intercooler hose though...
lewis1641- WingMan
- Posts : 1002
Join date : 2011-01-18
Age : 45
Location : brigg -
![]()
![]()
Re: budget 20 valve turbo build from page 5
![]() lewis1641 Mon Oct 29, 2012 10:17 am
lewis1641 Mon Oct 29, 2012 10:17 am
hope you approve...
IMAG2098 by lewis1641, on Flickr

IMAG2097 by lewis1641, on Flickr
apologies for the low light pics
got a few other jobs looked at too, nothing exciting but connected the vacuum pipe for the brake servo, used one off a 1.9d mk3 but that wasn't really necessary, just made it a bit easier and tidier.
Installed the 1.3 golf clutch cable which seems to actually do something
Relocated the battery slightly, its still on the battery tray but running front to back and tucked right under the slam panel. This has negated the need to put a tight s bend in the intercooler pipework. Looks a lot neater too.
Offered up the vr6 shifter assembly only to find its been hacked with so not wide enough to fit. Going to have to cut and shut the base off the mk2 one
lewis1641- WingMan
- Posts : 1002
Join date : 2011-01-18
Age : 45
Location : brigg -
![]()
![]()
Re: budget 20 valve turbo build from page 5
![]() jonny54 Thu Dec 20, 2012 4:34 pm
jonny54 Thu Dec 20, 2012 4:34 pm

jonny54- Can't Shut Me Up

- Posts : 353
Join date : 2011-02-27
Location : Lincoln
![]()
![]()
Page 3 of 3 • ![]() 1, 2, 3
1, 2, 3
![]()

 Similar topics
» Mk2 Build Thread
» chatting in build threads
» The 'Cabbage' Build Thread
» Slim's Rado Turbo
|
|
|